6 key positions that will add power to your golf swing
Golf instruction is ever-evolving, but the best advice stands the test of time. In GOLF.com’s new series, Timeless Tips, we’re highlighting some of the greatest advice teachers and players have dispensed in the pages of GOLF Magazine. Today, we have some tips from our July 2001 issue on how to add more power to your swing.
So you want to hit the ball longer? Join the club. There’s no ability in the modern game that is more sought after than power off the tee.
Speed training and improved fitness are two obvious avenues for achieving that goal, but there’s another way to add yards to your drives: improved technique.
Improving your swing technique is not an easy change, but when done correctly, it will add seemingly effortless power to your game. So, what are the methods for improving your technique? You can start by striving for a few key positions that will unlock extra power in your swing.
Back in the July 2001 issue of GOLF Magazine, Master Teaching Professional Robert Baker wrote a feature about the six angles that are key to producing power. Hit them in your own swing and you’ll soon be bombing it longer than ever. Check it out below.
6 angles for more power
Like many of you, | used to sit in math class and wonder, “How is this going to help me in real life?” Now that I’m a teacher, I have found a practical application, and it’s one I think you’ll find more useful — and much simpler — than architecture or rocket science: extra yards off the tee.
Here’s how it works. During a powerful golf swing, various parts of your body form very specific angles. These “power angles” are easy to visualize and understand, allowing you to cut through the confusion that often accompanies the golf swing. Just match yourself to these six angles. Once you do, your body and club will be in the correct positions for maximizing your power potential.
Power hitters like Tiger Woods hit all six angles; the more angles you hit, the farther you will hit the ball. So let’s begin. And don’t worry: There won’t be an exam.
1. Left wrist cup
Formed by: The back of the left hand and the wrist at address.
Why it works: It indicates a strong grip, which helps close the face at impact — a must for solid contact and a draw, leading to extra yardage.
How to create it: At address, rotate the left hand to the right (away from the target), making sure to keep the thumb on top of the shaft. The angle is most effective when combined with a powerful release. Think of rotating the back of the left hand at impact so that if you wear a watch, its face is looking at the target, then faces the ground in the follow-through.
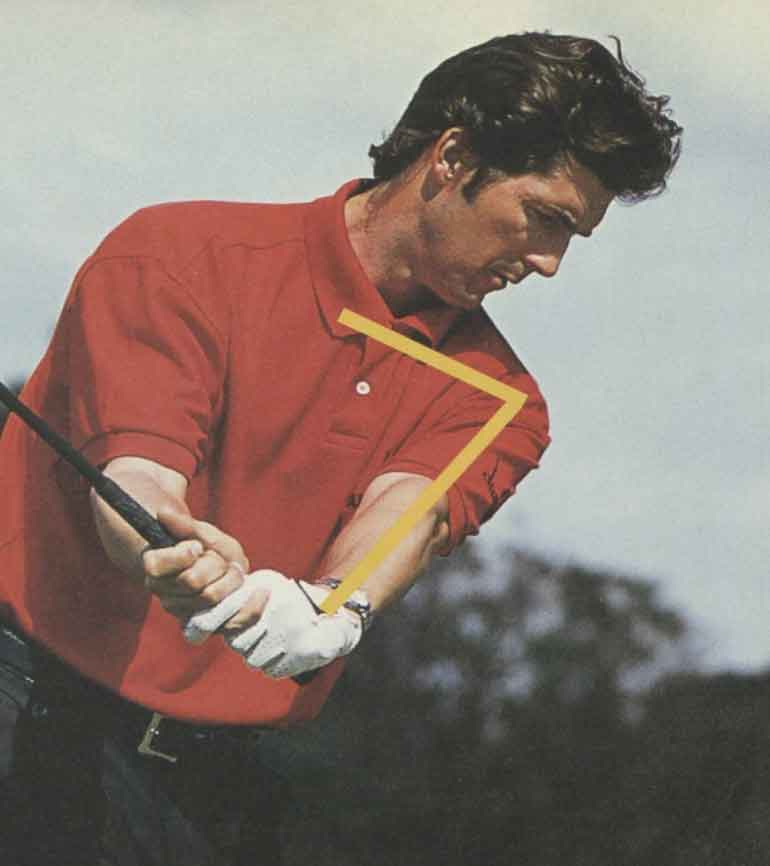
2. The “7”

Formed by: The left shoulder and arm in the backswing.
Why it works: It creates width and allows you to turn your left shoulder fully — crucial elements for setting up power during the backswing. This shoulder rotation is the key: You can’t build power — or form the 7 — if you take the club away only with the arms.
How to create it: Maintain the relationship between the arm and the shoulder established at address — the 7 — for as long as you can in the backswing, turning the shoulders while keeping your hands in front of your chest.
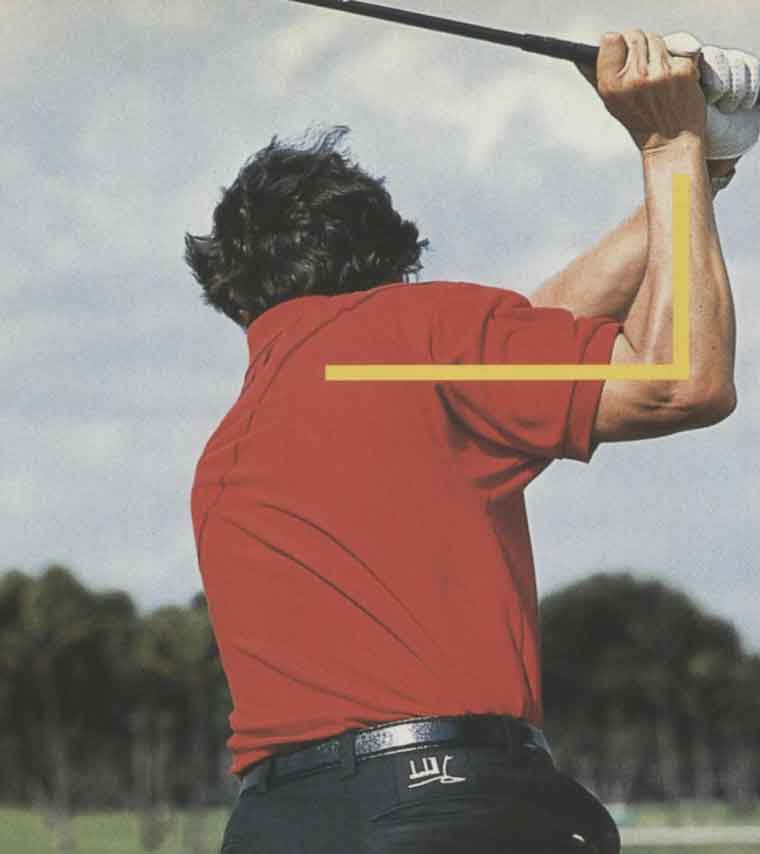
3. The corner

Formed by: The right arm at the top of the backswing.
Why it works: It ensures that your swing arc is wide and the club is in the correct position at the top of the backswing. From here, the arms can simply drop straight down and through impact. If your right arm folds past 90 degrees, the swing narrows and the club gets too far behind you, forcing you to recover (unfold the arms) before starting down. This is wasted motion that drains power.
How to create it: Limit your right-arm bend at the top of the backswing to 90 degrees, then drop the arms in the downswing.
4. Right leg lean
Formed by: The right leg during the downswing.
Why it works: Weight shift is a key power producer. You need to shift your weight away from the target in the backswing to store power, then toward the target in the downswing to release it. Creating this angle will ensure that your right side fires toward the target. In addition, the angle will help move the low point of the swing just behind the ball for consistently solid contact, another source of power off the tee.
How to create it: You must first shift onto your right leg in the backswing. Then, roll in the right ankle to fire the leg in the downswing. You want the right knee to follow the club to impact.
5. Inside approach
Formed by: The back of the right wrist in the downswing.
Why it works: It means the club is approaching impact from inside the target line. From here, the club will meet the ball solidly with a square face. If your right hand and wrist form a straight line before impact, it means your swing is moving out to in, weakly cutting across the ball with an open clubface.
How to create it: Imagine the clubhead has come loose from the shaft at the top of the backswing. Think about trying to throw the head off the shaft to the right of the target with the downswing. To do that, you will need to drop your arms correctly to the inside — creating the angle — before releasing the clubhead powerfully to the right. The farther you want to hit, the faster you throw the head.
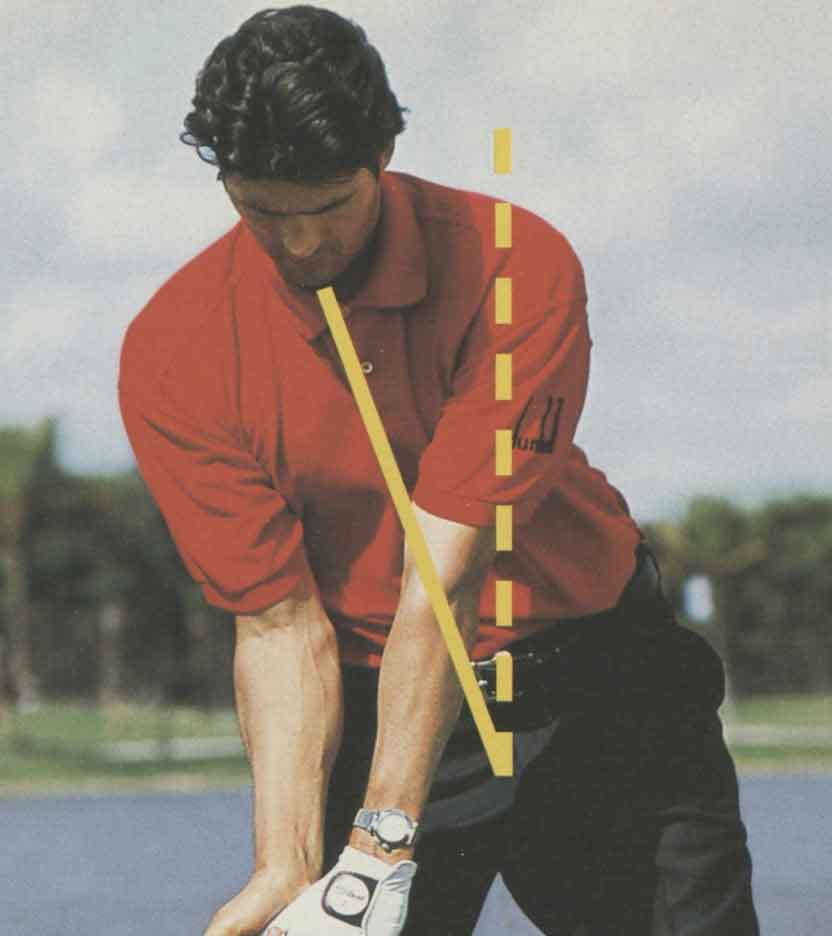
6. Spine tilt

Formed by: The upper body leaning away from the target through impact.
Why it works: Staying behind the ball at impact means the body is providing leverage for the arm swing, which means power. The hips should be ahead of your head, with the right shoulder lower than the left. This tilt will also shallow out the swing path, so impact is made with the clubhead slightly on the upswing, producing a higher launch angle and extra carry.
How to create it: Pre-program the angle at address by starting with your head behind the ball, weight favoring your right side, and your right shoulder low. Then simply turn back and through.
The post 6 key positions that will add power to your golf swing appeared first on Golf.


